Chicken Blocks for March

Chicken Blocks for March

March is my month to propose and collect blocks for a Charity Quilt.  In preparation for my month I had two happy accidents.  First I saw this quilt by Emily Dennis at Quilting Love (this is her photo):

quiltylove_EmilyDennis_chicken_quilt-4986

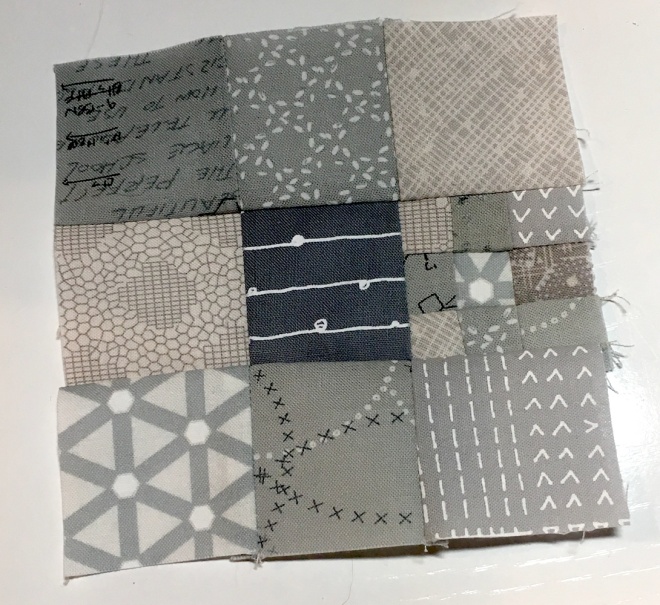
Then while at my local quilt shop right before New Years I found this awesome fabric:

chicken background fabric

So, obviously I needed to make a chicken quilt!

Emily’s blog post is here, and she links to the original pattern and tutorial for the Chicken Block: Chicken Quilt Block Tutorial by Sew Inspired.  I agree with Emily’s comment in her post that the instructions for attaching the comb is not entirely clear, so I’ll add some instructions of my own here.

Chicken Block Charity Quilt:

Please follow the Sew Inspired tutorial to create a 7″x8″ block (6.5″x7.5″ finished).

Body Fabric – black, grey or yellow – either solids or prints.  I like the look of the quilt that Emily created so the example above is a good one to use.  Note when you piece the chicken the 5.5″x6.5″ body piece should be placed with the 5.5″ side as the width and the 6.5″ piece as the height (see the diagram below).

Background – white solid or white on white print

Beak – Orange solid or print

Comb – Red solid or print

I drew this diagram to help with the assembly.  I got confused about which way the body was oriented and did it the wrong way the first time.  Go ahead and do all the triangle ‘snowballs’ on the edges before you do the comb (through step 4 on her tutorial).

chicken diagram

Comb Tutorial:

  1.  Cut two 2″x2.5″ squares as instructed in the tutorial.
  2. Draw a comb shape on the wrong side of one rectangle.  Orient the rectangle so that the 2.5″ side is the width and 2″ is the height.

marking the comb

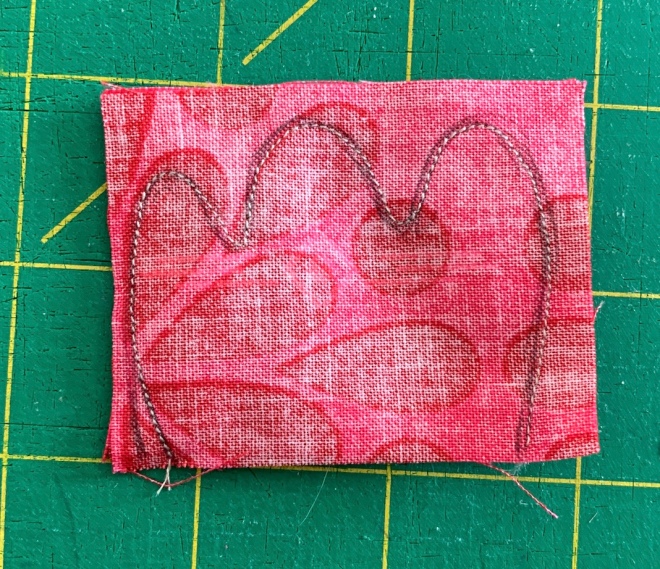
3.  Put the squares right sides together and sew on your comb line:

sewing the comb

4.  Cut down the excess around the sewn line and clip the seam allowance where you have tight curves.  Here I’m trying to show that I clipped it in the ‘valleys’ between the comb bumps:

cutting the comb

5.  Turn the comb right side out and press:

turning right side out

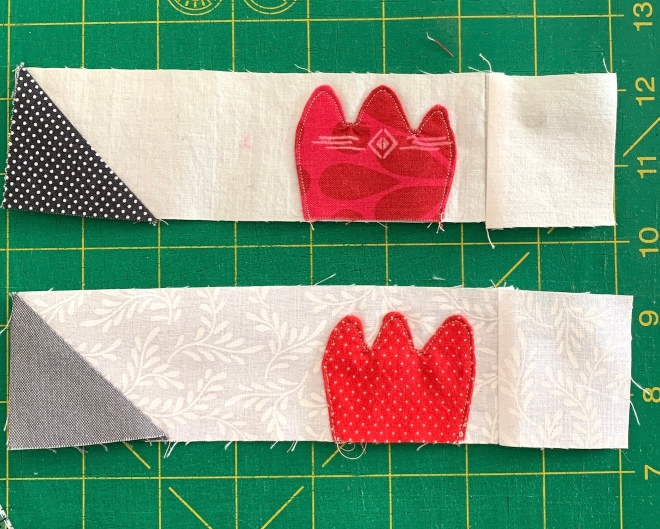
6.  Place the comb on the top background strip (2″x5.5″) that already has the chicken body triangle attached.  You can see below I drew a 1/4″ line on the right side of the background piece to help keep the comb away from the seam allowance.  I should have done the same across the top!

quarter inch on the side

7.  Top stitch the comb down by stitching around the edge of the comb:

sewing down the comb

8.  Sew the 2″ square background piece on the right side.  You can see here I did better with keeping the comb away from the top seam allowance on my second comb:

comb comparison

9.  Join the rest of the pieces and admire your cute chicken!  With my pin cushions I’m really gathering a flock.

blocks with cushion

I hope you enjoy making your chickens, and I can’t wait to see them all!  If you choose to participate, please send me your blocks by April 15, 2019.  Bee Inspired members have my address, but if you just want to join in and send me blocks leave a comment and I’ll get you my address.

Happy chickens!

Ann from Brown Paws Quilting


The Finished Great Dog Quilt

The Finished Great Dog Quilt

I finally finished The Great Dog Quilt from my 2017 blocks.  I got it all quilted and bound, and I think it looks great:

with 3 dogs 2

Here is a close up of a few of the blocks:

close up bucky leo

If you want to see more detailed photos you can head on over to the post on my blog post here.

Thank you all so much for making and sending me such wonderful blocks!

Spinning Star Block for Jen

I will admit that I was’t really sure what to do with Jen’s June Bee request of ‘Maker’s Choice’.  I thought it would be a good opportunity to design something, but my June was just crazy busy at work so I didn’t really have the mental space to dream up something new.  By mid July I was really late and was looking for something kind of straight forward to do, but in the end I wanted to at least try something new.  I gathered a bunch of blocks on Pinterest and considered a few, but I kept coming back to this one:

Spinning Star

photo credit – Paula Storm designs

I’m pretty good at figuring out how blocks go together, but this one I just could not get.  I tried a few times to find the pattern source for the block, but all the images I found on Pinterest only linked back to photos of the blocks.  Finally on Saturday night I had a breakthrough and found the pattern and a tutorial here.  It’s from a quilt along designed by Paula Storm.

This site has a link to a pattern page.  The tutorial shows how to do the foundation piecing with freezer paper and how to do the middle block that includes an inset seam.

Here is my block:

IMG_8003

Putting it together really wasn’t that hard, and the tutorial helped a lot.  The only issue I had is that when I print the pattern page the 1″ scale on the page comes out about 1/8″ too small.  I’ve never had this problem with a pattern I’ve printed from an online source and I’m not sure how to get it to the right size – it is already set to print to actual size on the printer settings.  My block came out a bit small, but as it doesn’t seem Jen is going to put these together in to a quilt I’m hoping it doesn’t matter.  🙂  I might try and draw up my own version to get it to finish at 10″ and then make a few for a quilt of my own!

Let me know if you try out the block and if you have the same pattern size problem that I had.  I’d love to see more versions.

Ann, Brown Paws Quilting


February 2018 Bee Block

February 2018 Bee Block

This year I really wanted to design my own block, but I really had a hard time landing on a plan.  I’ve seen this technique for making scrappy strips online and have always liked it, so I decided to go with that.

I wrote up a tutorial for making the scrappy strips and the blocks on my blog here.

The tutorial shows how to make the scrappy strips on a base of a 2″ muslin strip.  I used muslin rather than paper or receipt tape because I didn’t want to remove all the paper.

This is my scrappy strip before trimming:

strip before trim

and after trimming:

strip post trim

And these are the blocks I made:

both blocks

For my block, I would like:

  • A 12.5″ block with an all white background
  • The use of at least 2 scrappy strips per block.  How you arrange the strips on the block is up to you.  To have 2 strips on a 12.5″ block you’ll need about 30″ of scrappy strips – might be best to just do a full yard.
  • For the scrappy strips, I’d like the scraps to be as brightly colored as possible.  Batiks are fine.

I’m looking forward to seeing what everyone comes up with!  Good luck!

August is here, and it’s my turn to be Queen!

August is here, and it’s my turn to be Queen!

This was a lot harder than I thought it would be.  I had a really hard time finding a block and deciding what to do, but I’m happy with the block I chose.

I’ve been admiring the Elizabeth Hartman critter patterns and looking forward to trying them out, but in the meantime I found this quilt-a-long from a few years ago that has a similar feel.  I apologize for doing another dog block so soon after Karen’s poodles, but I just love these guys.  They remind me of my boys, Bucky and Leo…and after all, my blog is named after Leo’s brown paws.

The quilt-a-long, which happened in 2015, is from Lorna at Sew Fresh Quilts.  The original “Dog Gone Cute” blog page is here.  Here are the details for our bee blocks:

  1. Please do the large blocks (18″ x 12″)
  2. I’d like the background to be white, or a white on white print.
  3. The dog face should bright color.  Prints and batiks are fine, but the fabric should read as one primary color (red, blue, orange, purple, green…you get the idea).
  4. Eyes and nose should be black, or a black print.
  5. for the contrasting part of the faces, I used grays.  You can use another coordinating color with your face fabric if you like.  I was struggling with this fabric as the background is white, and I wanted something to stand out both against the dog face and the background.  I think the gray worked well.

She has 8 different dogs to choose from.  You can choose whichever one you like – I’ll give you some tips on that here in a minute.

This is some inspiration for what I have in mind.  This was a quilt completed by Gina at Quilts and Cakes (blog post here) from the original Quilt-a-long in October 2015:

sample dogs

The links to the block patterns:

Quilt-a-long kickoff post (interesting for background purposes)

Blocks #1 and #2

Blocks #3 and #4

Blocks #5 and #6

Blocks #7 and #8

My suggestion, and request actually, is that you think about a dog who had some meaning to you and find one of the block patterns that most makes you think of that furry friend.  If you are not a dog person, that’s ok, I can recommend some pups to use as inspiration!

I did do some block testing and have some thoughts to offer.

I decided my Leo looked like block 5, and my Bucky looked like block 3.  Block 3 was much easier than block 5, but both came together very well.

For each pattern, there is a table with cutting instructions.  I copy/pasted that table into Word and printed it out.  I crossed out the small block column to help me avoid confusion, wrote the colors of the fabrics I was using in each section, and crossed off the pieces as I cut them:

cutting tables

I then cut all the pieces, and pinned letters on them so I knew which ones they were.  This was REALLY helpful, as with them marked I could just walk through the rest of the tutorial.

cut blocks

From there, I just went step by step through her instructions.  It was really straightforward, and actually didn’t take too long.

This is my Leo (Mr. BrownPaws):

leo block

and my Bucky (I got to try out my new Moda Grunge Hits the Spot!):

bucky block

and I had to make the boys pose with their blocks (Leo insisted on bringing along his parrot stuffy):

leo and his block

bucky outtake 4

Many outtakes were required, for which they were rewarded with ice cream later:


If you don’t have furry friends to use as inspiration, here are a few more of mine, past and present:


The big one is of our Sporty and Katie, who have now passed.  Upper right is Maggie, our corgi.  Middle right is Sandy, our crazy Jack Russel Terrier who left us 3 years ago.  And the bottom right is Sporty after we adopted our two boys, Bucky and Leo.  All of our furry kids have meant so much to us, and we love them all.

I hope you enjoy making the blocks – I look forward to seeing what you all create!


April and May Brown Paws Blocks

Here we are into June, and I haven’t yet posted about my April and May blocks.  Both were fun to do, and I’m happy with how they came out.

This was April – fun birds for Velda from GrannyCanQuilt.  My first block is this one:

first birds

I’m also making my own set of blocks from a Me+You bundle of batiks, duplicating each of the monthly Bee blocks.  These are the bird blocks I made from my own quilt:

me+you birds

I just love these blocks, and they are a great way of using up scraps.  I might start making my own set of blocks for a big bird quilt!

For May, Irene of Patchwork & Pastry went a very different direction.  She was looking for a very subtle palette with an assortment of grays.  At first I was worried that I wouldn’t have enough grays to  get this block to come together, but I was really surprised with the selection I had.  This was my fabric pull – the photo is in monotone to check the values:

Gray block fabric pull

Her block was a series of 9-patches gradually increasing in size.  Here it is coming together:

gray first piecing

Look at that cute bitty 9-patch!

small 9 patch

And the final block:

gray full block

I’m really pretty happy with it – it came out a bunch better than I thought it would.  I’m going to have to figure out how to adapt this block to my Me+You color palette, which is a lot more colorful.

I hope Velda and Irene like their blocks – both have been sent off.

Now on to French Poodles in June!


Trees and Gnomes for Kate

Trees and Gnomes for Kate

I was able to grab some time between trips to get my March block done.   I have to admit I wasn’t totally crazy about it to start, but making the blocks was an interesting process.  And doing different things is kind of what this is about, isn’t it?

Here is my fabric pull – I was drinking coffee in my New Mexico mug on a Sunday morning:

And here is my finished block.  I was in deep concentration trying to make the trees, and especially putting the darn trunks on the trees – they kept winding up way off to the side – so I don’t have any in-process photos.


My one tip would be to fold the bottom piece in half to get a crease, and then set it under the tree/gnome before cutting to put in the trunk to get a sense of where the trunk is going to wind up.  Before I did that, I kept cutting my bottom piece way too far over on one side or the other, and the trunk wound up in an odd place (see the bottom 2 trees).  But overall I’m pretty happy with it, and got it sent off to Kate Friday morning.  I do hope she likes it.  I think the gnomes are cute!

A Blue Block for Sue

A Blue Block for Sue

I had a good time pulling fabrics for this block.  Perhaps I took the monochromatic direction a bit too literally, but I really liked the example blocks that Sue provided, and they led me to this blue:

february-bee-block

I think this is a really cool block – very colorful and clean.  Thanks for the inspiration Sue!  I mailed off the block this afternoon – it might take a little bit of time to get to you.

In addition to her block, Sue requested that we talk a bit about where we all are from.  Let me tell you a bit about Albuquerque, New Mexico.

New Mexico is in the Southwest, with Albuquerque as the largest city and Santa Fe the capital.  I’ve lived in Albuquerque for just about 25 years – a transplant from the midwest where I grew up.  New Mexico is known for our many days of bright sunshine and beautiful blue skies.  We have four seasons, which is great, but it is generally much warmer than my native states.  My favorite season is fall, when it is warm and sunny and you can smell roasting green chile in the air.  The worst season is spring because it gets really, really windy.

This is a photo from a walk in late fall – it was a beautiful day for a hike in the Petroglyphs area:

petroglyphs

Albuquerque is known for our annual Balloon Fiesta.  It is held every October and it is amazing.

balloons-in-the-sky

I think these guys are appropriate for our group:

bee-balloon

Northern New Mexico – closer to Santa Fe – is Georgia O’Keeffe country.  There are more mountains up north, along with red rocks.  This is a painting that hangs in the Georgia O’Keefe museum in Santa Fe.  I love that museum and go up to Santa Fe to see it a few times a year.

georgia-mountain

A few other quick New Mexico facts:

  • New Mexico has a rich Native American history and presence.  There are many Pueblos across the state, and the Indian Pueblo Cultural Center in Albuquerque is a really interesting place.
  • Our state question is ‘red or green’ – which refers to chile.  You are often asked this in restaurants to find out if you want red or green chile on your food.  The correct answer is Christmas – which means both!
  • We are, in fact, a state and not a non-US country.  It is not all that uncommon for non-New Mexicans to ask if you need a passport to go to New Mexico.
  • Other great things to see in New Mexico are:  galleries and museums in Santa Fe, Carlsbad Caverns, White Sands National Monument, Chaco Canyon, Ojo Caliente Hot Springs, and the town of Taos.  All very pretty, and typically not overrun by hoards of people.
  • The film/TV industry has started filming here quite often.  It is fun to watch shows like Breaking Bad, Better Call Saul, and Longmire, or movies like The Magnificent 7, and see familiar landscape.  The new Wolverine movie was filmed here just recently.


Come visit me!