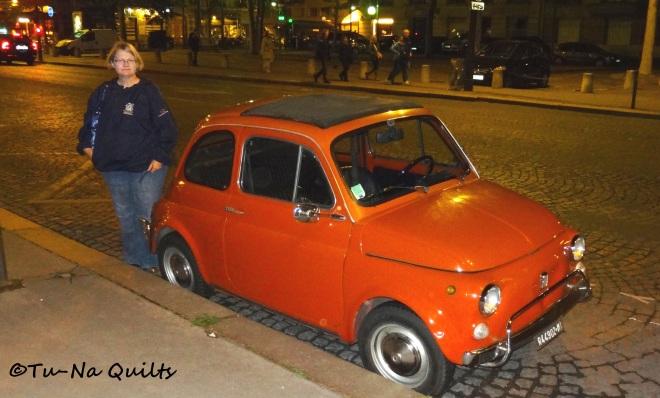
We started the day early as our museum pass was about to expire and we still had more things to see. Here’s a few of the highlights of the day.

I thought street performers were found only in New York. This one amazed me since I thought he was a sculpture.
We visited Sainte Chapelle, Notre Dame Cathedral, and a modern art museum. I’m not sure where I found my energy to keep going day after day.

About 1/5 of the stained glass windows were covered with scaffolding on the inside of the building; they were being cleaned and restored, if needed. Even so, the place was magnificent. There are 1,113 stained glass windows with each one depicting a different story from the Bible. Next time I go, I’m taking a pair of binoculars to see them closer.
We stopped for some crepes at a cute little Creperie right outside the modern art museum.
This slideshow requires JavaScript.
In the modern art museum, we saw art works by Matisse, Picasso, and others. Here’s just a sampling. Click on each pic for more info. There were some really nice pieces as well as some that were, well, interesting.

Portrait de Greta Prozor by Henri Matisse

Le guitariste by Picasso

La Toilette (Femme au miroir) by Spiegel

La liseuse by Picasso
And some that were really off the wall.

Yes, that’s a chair hanging on the wall. There was another one: a fold-up bag chair but I figured you all know what one looks like .
What I learned today…Mercredi April 23, 2014
- French onion soup tastes much better in France than at home.

- How to eat a real French crepe: First, eat some of the extra filling. Second, spread the remaining filling. Third, roll it up. Fourth, cut it in half to share with husband knowing he’s doing the same with his.
- Six consecutive days of a Paris museum pass was a lot to do. We visited the Louvre twice, the d’Orsay, Rodin, modern art museum, Notre Dame, St. Chappel, Notre Dame Crypt Archeological museum, d’Orangie, Invalides, Army museum, Napoleon’s tomb, Arc of Triomph, and Palace at Versailles. I think we got our money’s worth. There were only 47 other museums listed on our pass that we didn’t get to. We tried our best.
- Shoe shopping in Paris should be easy; every other store in the Chalet and Les Halies sections are shoes stores. Good to know if I need to buy more shoes.
- The half-size dishwasher in our furnished apartment is just the right size.
Poodle Block Tips:
Now onto Part Huit (8) Some Assembly Required. This will complete the poodle block. (You will find links to Parts 1-7 at the very end of this post.)
Using Sally’s tutorial for her right facing poodle found here on The Objects of Design or my tips below, let’s begin arranging the pieces. Think of it as putting a puzzle together. Hint: Use a large flat tray, design board or cutting mat that you can move closer to your machine, unless you need lots of exercise.
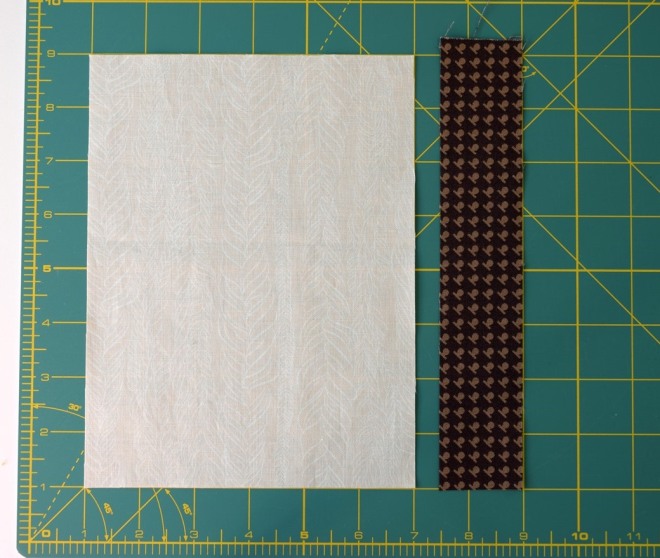
I will begin assembling this pooch one row at a time. Let’s think of it as a row by row. A picture follows each row description. If you laid out the frame already, you’ve already got some pieces in place. I’ve enlarged the labels only in that specific row to further help you. Be prepared to be amazed and amused as your playful puppy begins to grow right before your eyes, kind of like they do in real life.
Row 1: Top left corner, top of head, top right corner

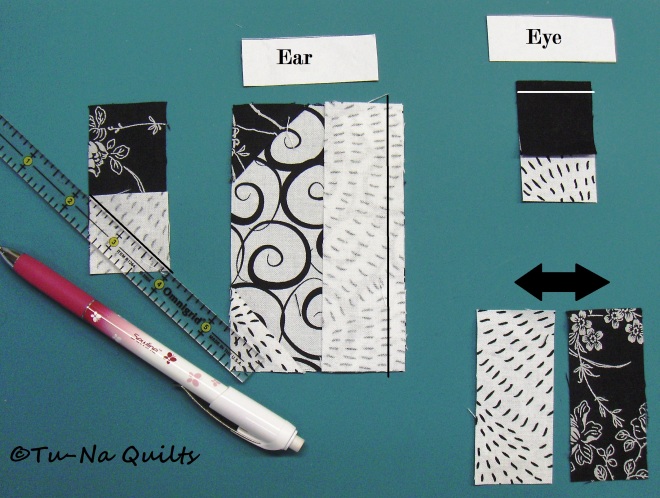
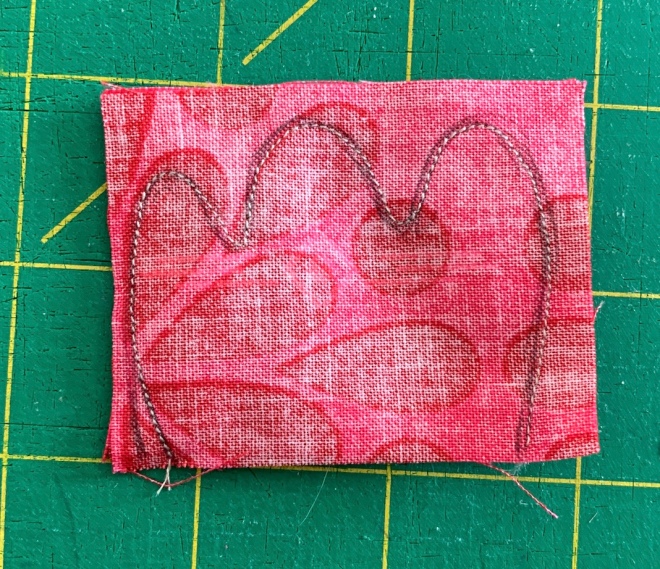
Row 2: Tail, Extra tail piece made in part 7, Above back, Ear, Eye, Nose

We’re using one of the unlabeled pieces from part 7.
Row 3: Behind rear under tail, Body, Chest
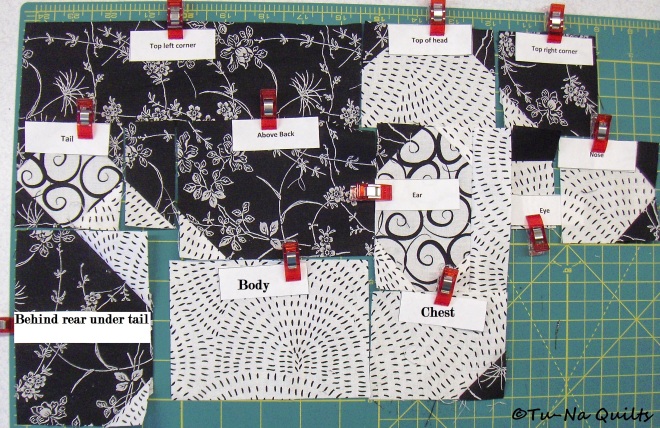
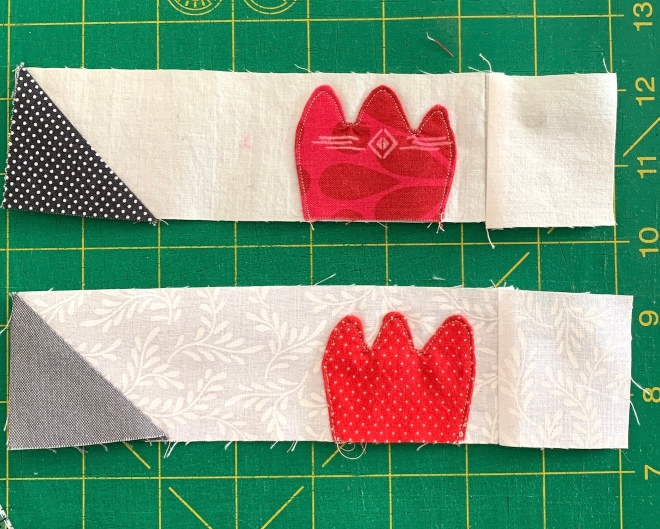
Row 4: Lower left middle, Under Belly, extra front leg piece made in part 7

Here’s the other unlabeled piece that was made in part 7.
Row 5: Bottom left corner, Foot poof, Bottom middle, Foot poof

Extras to add: Add the Right side under muzzle piece to the right side of the block and the two pieces labeled Foot to the bottom of each Foot poof

That should be all of your pieces. Now the fun begins; bringing life to this little fella by using needle and thread.
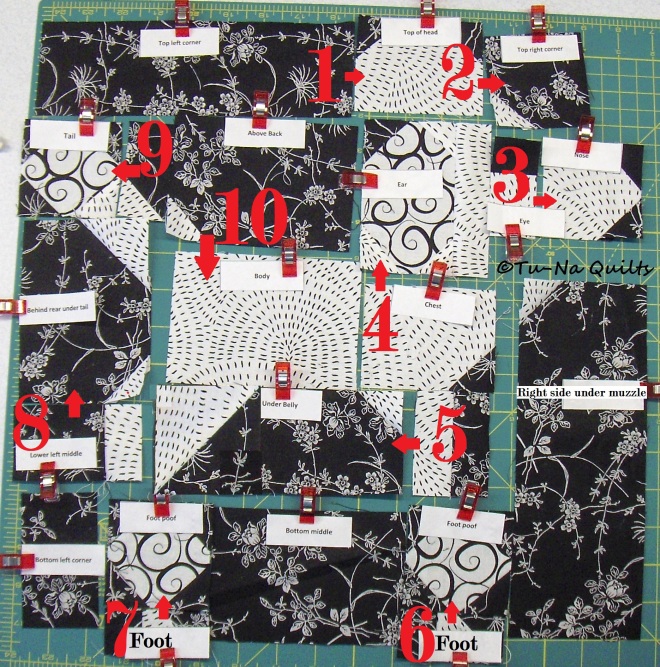
You might be scratching your head, hopefully with your hand and not your foot, and wondering where to begin. There’s a logical sequence that makes it come together quickly. Just follow the pictures below and the list of seams to sew in order and you’ll be well on your way to petting this playful pup. The red numbers on the pictures below correspond to the number of the seam that you will be sewing. I’ve listed it out here for you too. Start with number 1.
Hints to remember: Check the two pieces that you will be sewing to see if you’ll be sewing two flip triangles or seams on top of each other (it will get a bit bulky). If so, just flip one to the other direction. Doing so will also help you nest those seams tight. But it’s not the end of the world if it just doesn’t work out; don’t go ripping it all apart to make it lay down. Just say, “I did my best” and let it roll over you.
The First Seams (Sew right sides together 1/4″ scant seam allowance for all the seams, press to the side—I found that most pieces had a natural tendency to lay to one side or the other)
- Top left corner onto Top of head
- Top of head to Top right corner
- Eye to Nose
- Chest to Ear
- Extra piece to Under belly
- Foot to Foot Poof
- Foot to Foot poof
- Lower left middle to Behind rear under tail
- Extra piece to Tail
- Above back to Body
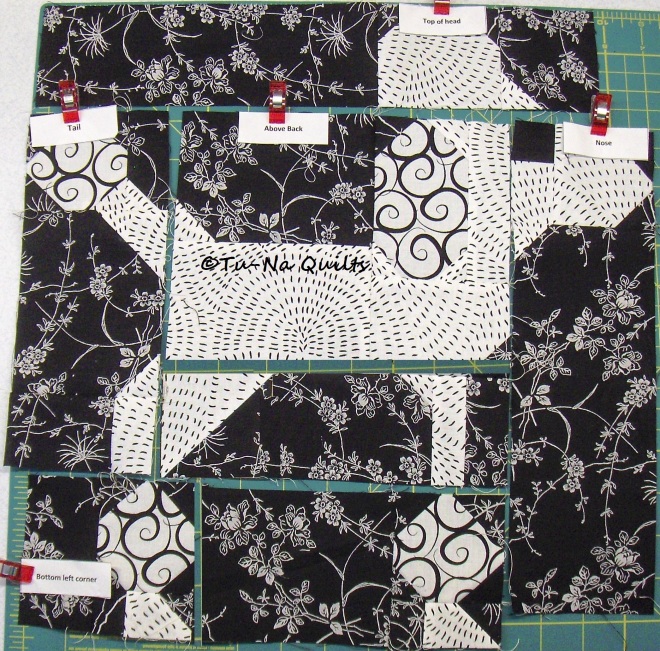
Now let’s see what we’ve got!

You can see there is progress as there are less labels. I keep at least one label on each section while sewing so I don’t get confused.
We are getting closer to done with each seam and this little guy will be ready to play.
Next seams to sew: The numbers correspond to the seams in the picture below.
- Nose to Right under muzzle
- Right foot poof section to Bottom middle
- Bottom left corner to left foot poof section
- Tail section to Behind rear under tail
- Back/Body section to Ear section

Now let’s take a look at what we have.
Just a few more seams to sew.
- Left foot section to the right foot section.
- Under belly section to Above back/body section.

Now your pampered pooch should be looking something like this:

Just four more seams and he/she will be begging for treats.
Sew the last four seams:
- Tail section to Body
- Feet section to the body section.
- Muzzle section (that would be his mouth/eye/nose section) to the body.
- For goodness sake, sew on the top of his head so you can pet him!

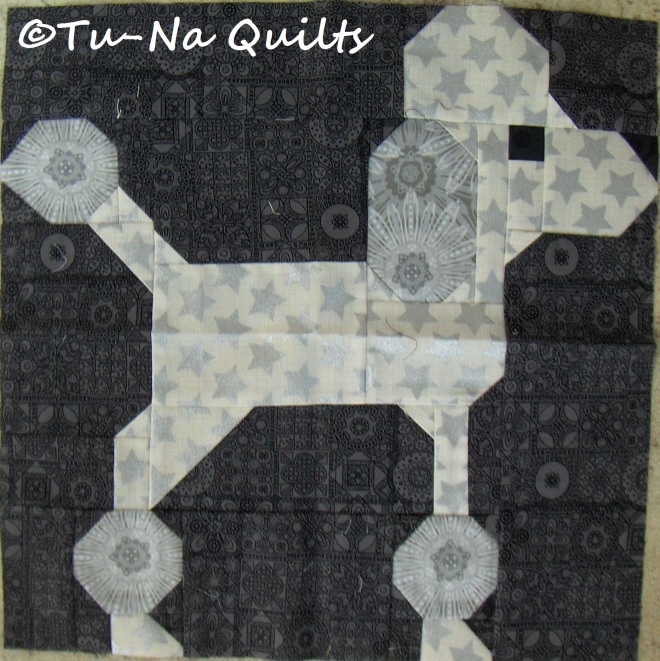
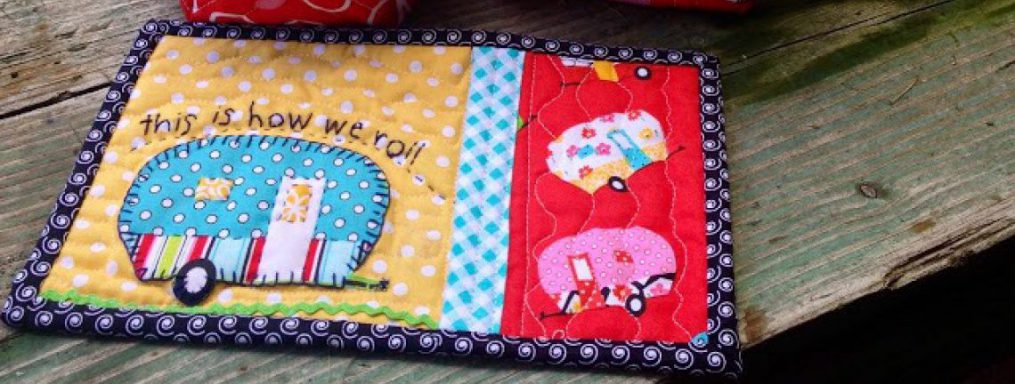
Voilà! Meet Cherise, my newest, darling, little poodle. She’s not only playful and perky but she’s also a little bit on the wild side. I caught her hanging out with the boys: Marcel, Odie, and Tigg. I’ll have to sew her in the middle of the quilt so she doesn’t escape.
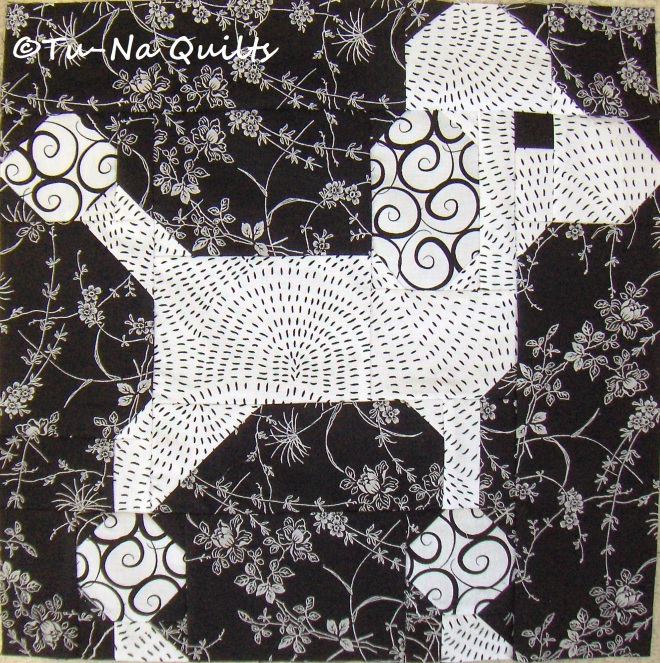
This is a 14″ unfinished block which will finish to 13.5.” Mine was right on probably due to my squaring up each of the pieces while prepping them and watching that scant 1/4″ seam.
What I Learned Today:
- Writing this specific post was very difficult. I kept getting the pictures mixed up. Let me know if you have questions or if I’ve made a mistake.
- When taking pictures of lots of pieces, make sure there is space between each piece so they can be seen as separate units and not a mess.
- I learned how to use more features in the photo editor program, Paint. It was a real time-saver or I would have had to remake this block. Maybe, someday, I’ll show you the bloopers.
- I’ve run out of days to post this month. I’m heading to the lake tomorrow and I won’t be back for a week. To my American readers, have a Happy Fourth of July! To all of my other readers, have a Happy Day!
- No more poodles arrived today. I’ll post when they show up.
- Homemade macaroons taste wonderful. I will be sharing about that experience when some of those poodles arrive.
Question: If you were to give a French poodle a name, what would it be?
If you enjoyed this post and would like to read more about my journey or follow me, please visit my blog, Tu-Na Quilts, Travels, and Eats. Thank you for visiting Bee Inspired.
Au Revoir
Karen, Tu-Na Quilts
Here are the previous poodle posts just in case you need to catch up to figure out what is going on this month at Bee Inspired. We’ve all gone on vacation—don’t we wish—to Paris. Well, maybe at least in our minds and imaginations.
Tu-Na Quilts: All Aboard. Fasten Your Seatbelts. We’re Taking Off for… You will find the pattern link for the poodle block in this post as well as why I chose this block.
Tu-Na Travels: Day One in Paris which includes Part un (1): Pattern and Fabric Selection.
Tu-Na Travels: Day Two in Paris and Poodle Block Cutting Tips which includes Part deux (2): Cutting and Anatomy Labeling.
Tu-Na Travels: Day Three in Paris and Prepping Those Furry Pieces which includes Part trois (3): Prepping the Furry Accent Pieces (Foot poofs, Tail, and Ear).
Tu-Na Travels: Day Four in Paris and Prepping the Poodle Body Parts which includes Part quatre (4) Prepping the Poodle Body Parts.
Tu-Na Travels: Day Five in Paris and Prepping the Background Pieces which includes Part Cinq (5) Prepping the Background Pieces.
Tu-Na Travels and Quilts: Day Six in Paris and Building the Frame Around Our Pampered Pooch which includes Part Six (6) Building the Frame Around Our Pampered Pooch.
Tu-Na Travels and Quilts: Day Seven in Paris and Finishing the Leftovers which includes Part Sept (7) Prepping the Last of the Extra Pieces.
Linking to Can I Get a Whoop Whoop? and Finished or Not Friday.


 As the Queen of March, I suppose I should feel bad that the weather for my month isn’t that great. Somehow though I don’t seem to care because besides a variety of weather, March includes the Spring Equinox, the Oscars, Palm Sunday and most of Easter weekend, and among other things Peanut Butter Lover’s Day, If Pets Had Thumbs Day, Popcorn Lover’s Day, Ear Muffs Day, National Proofreaders Day, Open an Umbrella Indoors Day, Girl Scouts Day, Something on a Stick Day, International Day of Happiness and World Water Day.
 All in all, I’m glad to be the Queen of March!

 So. Back to being Queen. It seems fitting (especially since it’s March) that I ask my bee mates to help me finish the quilt we started together by making me Shamrock blocks for my border. The blocks finish at 4″ (4-1/2″ unfinished) so I’m hopeful that some of you will make more than one block. Of course that’s optional, but it sure would be appreciated as I need to make 34 of them!
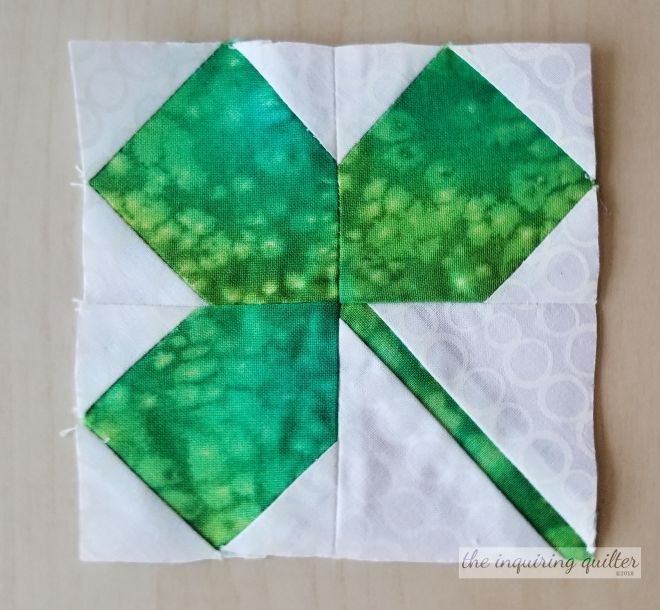 To make 1 block, you’ll need:
 Repeat this on two other corners as shown.
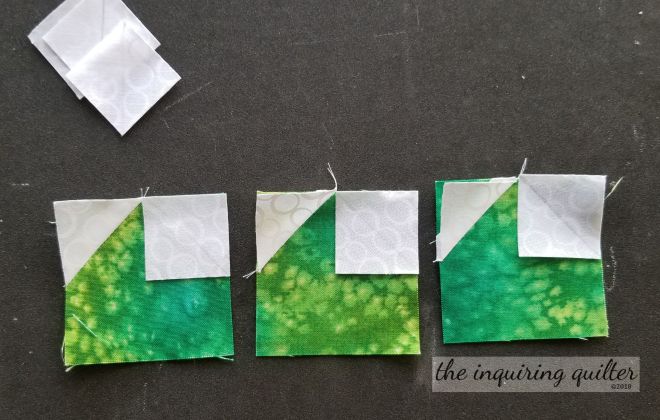


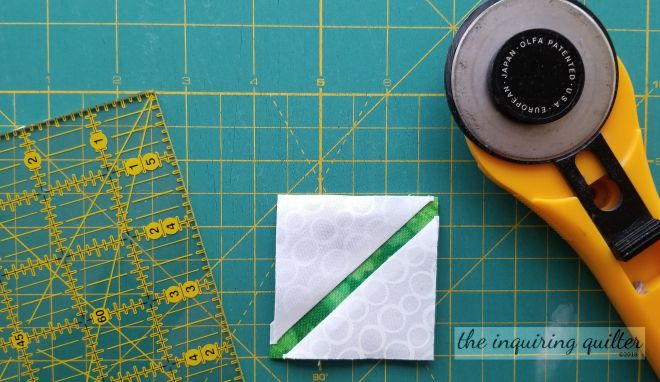
 Lay the other white triangle on top as shown, RST. Be sure to center the triangle as shown. Sew and press again, then trim the unit to 2-1/2″.

 Sew the block together in rows then sew the rows together.
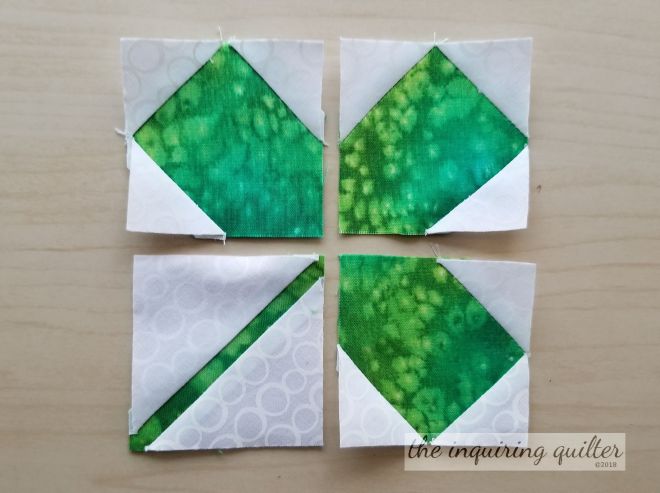

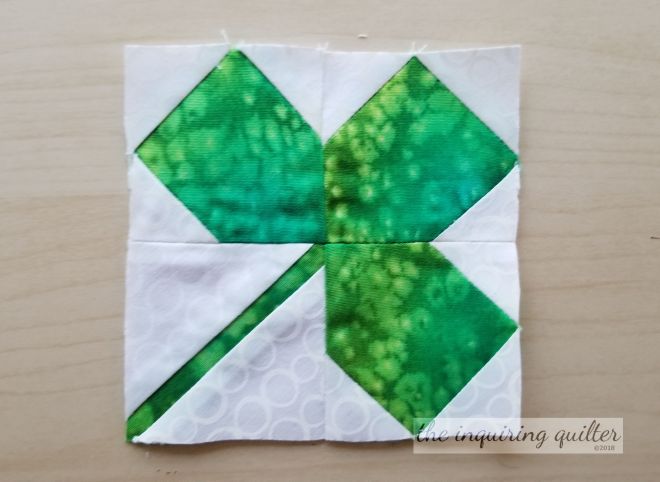 Here’s how I pressed the back. You can press it however you think best. I trimmed the block to 4-1/2″.
 You can use any green for the shamrock, but please use the same green throughout the block. I’d like to use white on white fabric for the background. Here’s my sample block.
 And here’s the quilt top as it looks right now, so you can see the variety of greens and whites used in it.
 Thanks everyone for letting me be Queen! I can’t wait to see your blocks.

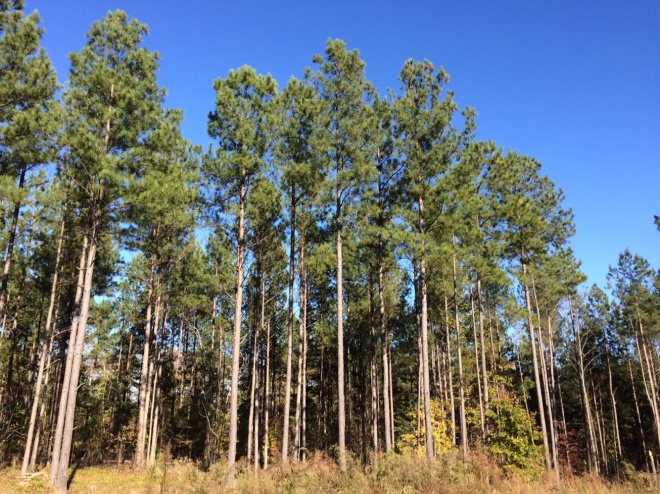 These pines have just been thinned (for the 2nd time) and will be clear-cut in another 10 years or more. Then, the process of planting and cutting will start all over again making forestry a natural renewable resource.
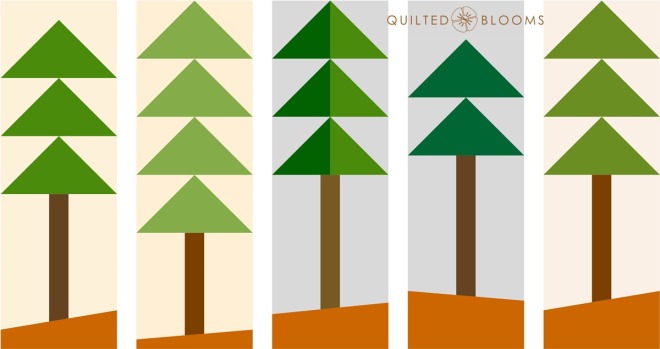 Planted Pines are constructed from a variety of more earthy greens in solids, tone-on-tones and prints with very little colors other than neutrals. There are exceptions, a tree would be beautiful in this Kaffe Fassett print which includes a little purple.
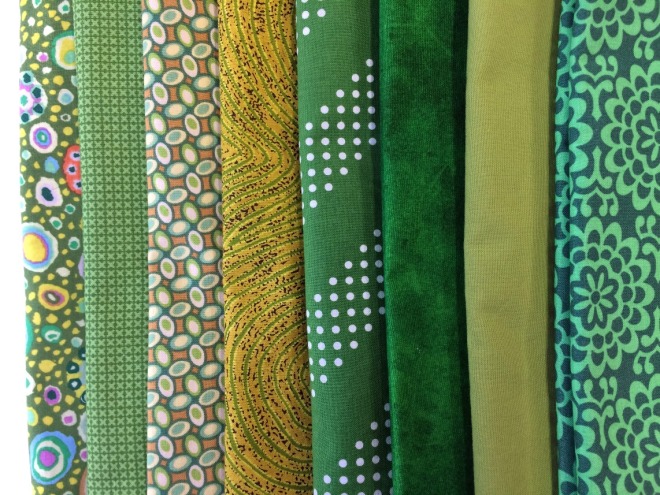 For the tree trunks, any browns from solids to tone-on-tones will work fine. And for the backgrounds please use creams, light tans, light gray, white or low volume. Here are some examples.
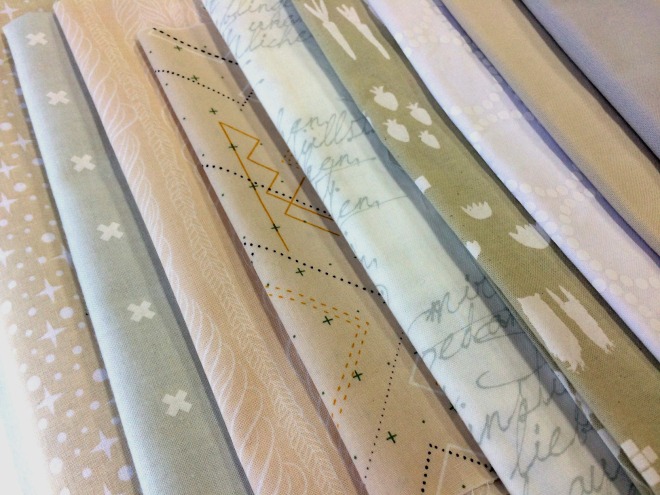 Fabric for the ground or red clay has been mailed to everyone. It’s burnt orange from In The Beginning Fabrics. I included 2 patches should you be industrious, but one will be appreciated.
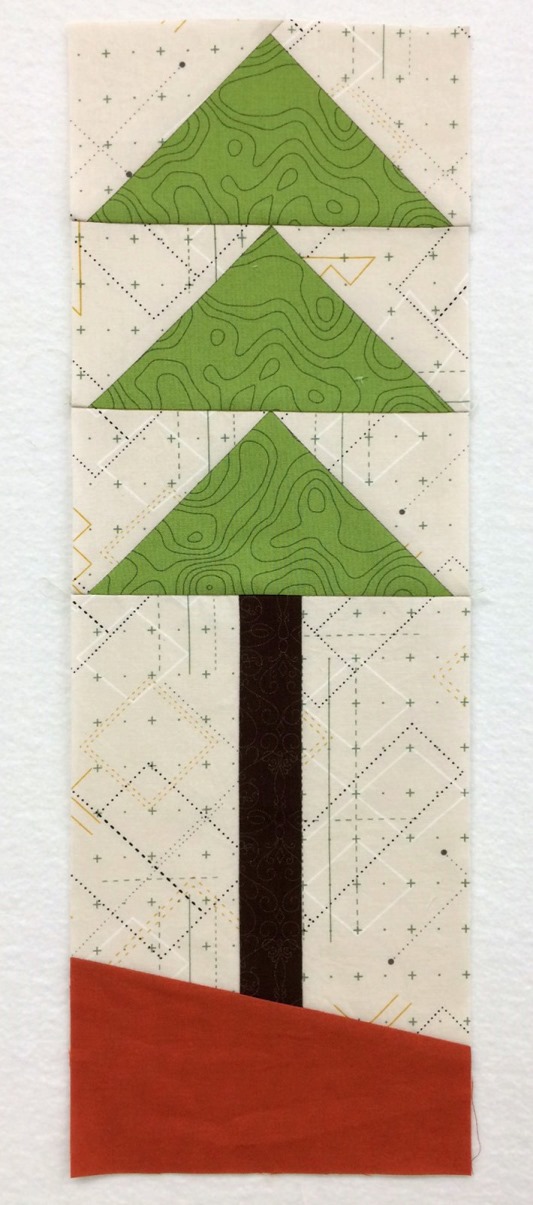
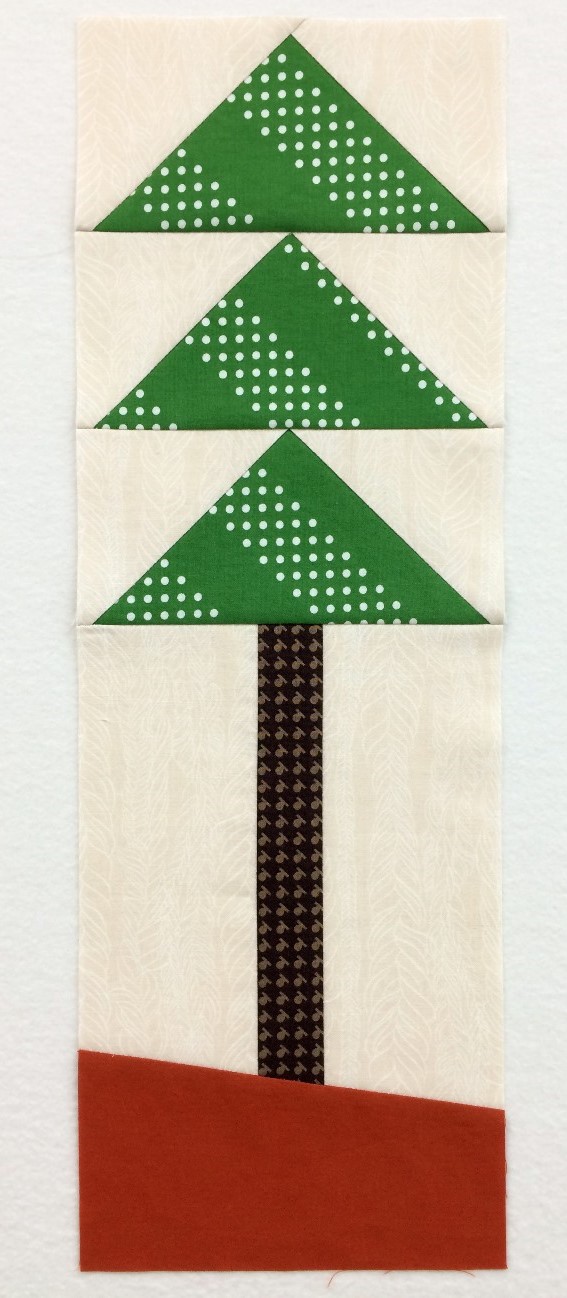 Now you have the idea, let’s start piecing Planted Pines.
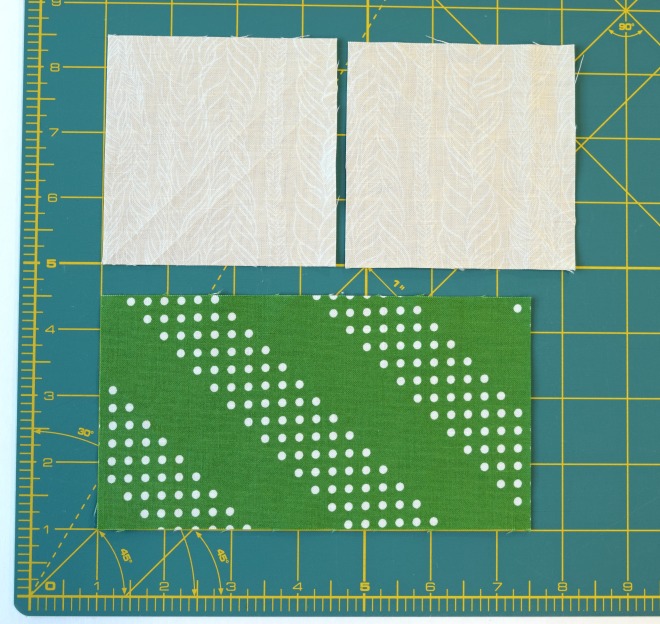 Draw a line diagonally from corner to corner, I used a hera marker. I also marked a line 1/2″ away from the first line. I plan to make bonus half square triangles (HSTs).
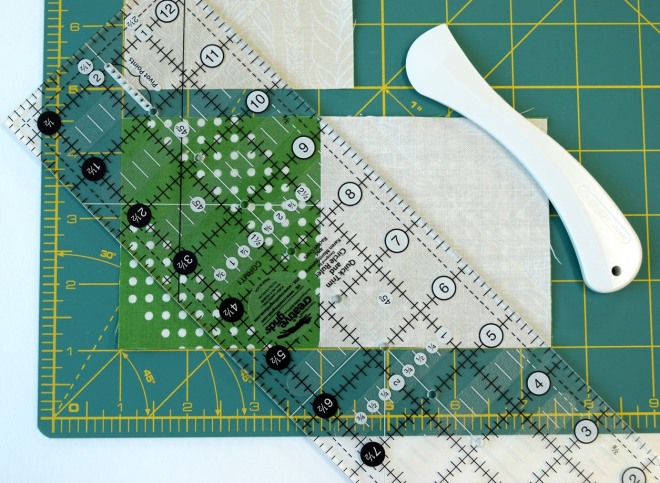 Stitch on one or both lines.
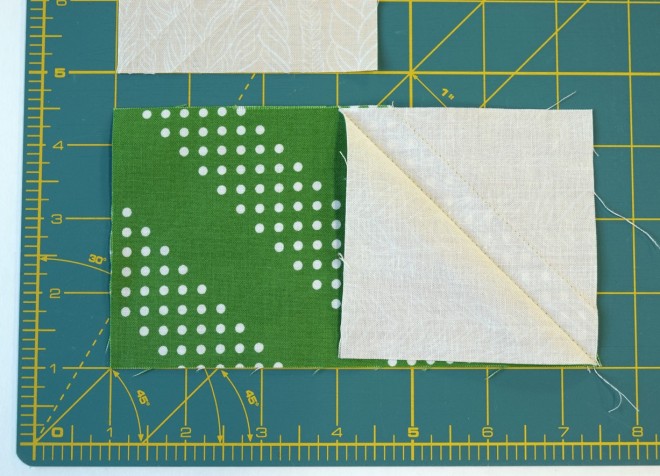 Trim the seam allowance to 1/4″ or cut between the two sewn lines. TIP: If you press and set the seam(s) before you trim, you will have less distortion when pressing the bias seams. Since I am making the bonus HSTs, I flipped the unit over and pressed the seam toward the dark.
 Repeat with the other background square on the opposite side.
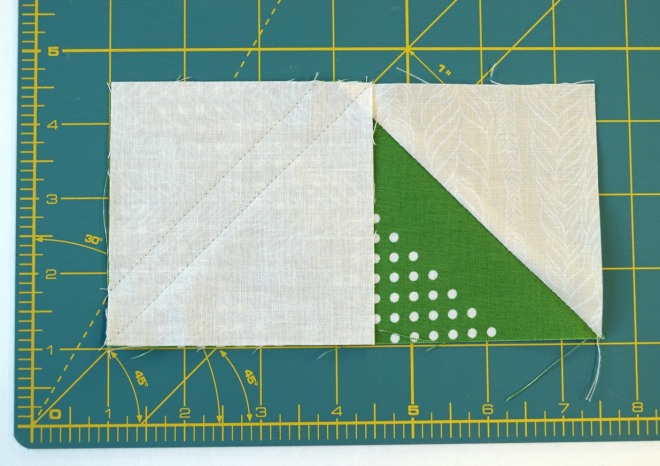 And now you have one flying geese unit. Repeat to make a total of 2, 3 or 4 flying geese. Sew the geese together with a scant 1/4″ seam. Press the seams toward the top of the tree.
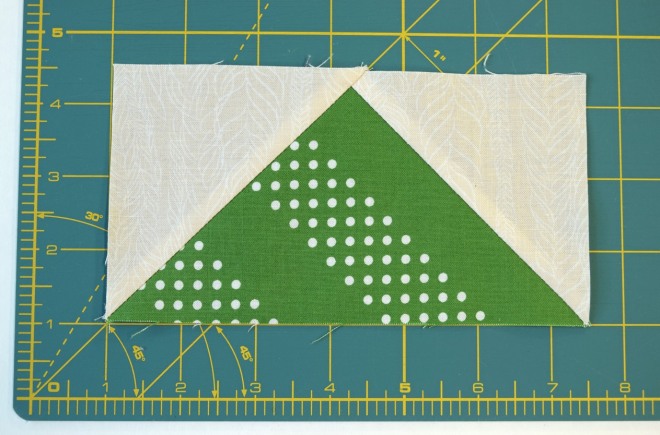
 Cut the background rectangle in half lengthwise resulting in two smaller rectangles measuring 3″ x 8″ approx.
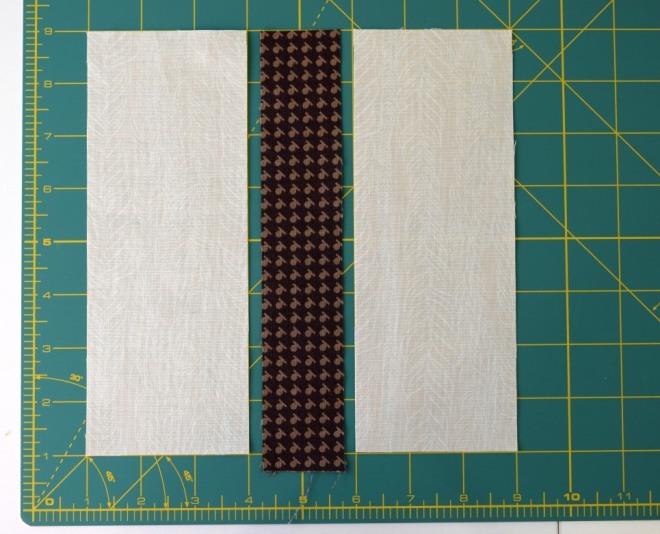 Sew the trunk between the two background rectangles. Press the seams toward the trunk (dark). The important measurement here is the width of the unit which should be exactly 6 1/2″ wide. Trim or square up the sides and the top of the tree trunk unit if necessary.
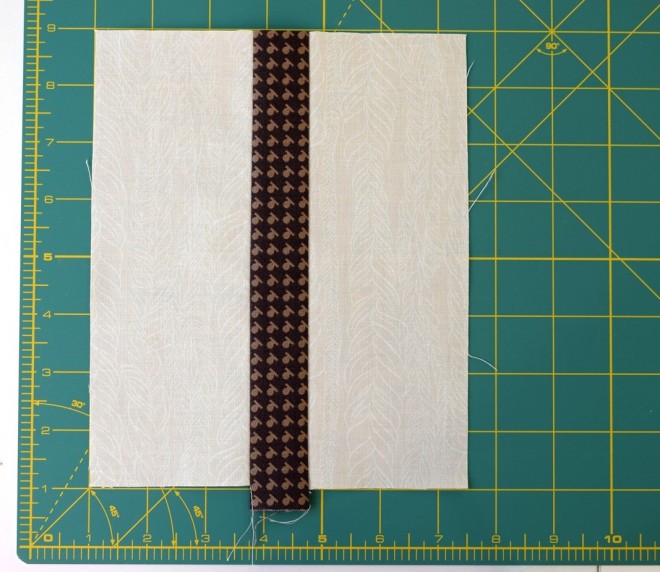
 Leave your ruler in place and make the cut.
 Lay the ground rectangle on your cutting mat like so. Place the tree trunk unit over the ground fabric centering it from side to side and keeping the sides parallel to to the lines on your cutting mat.
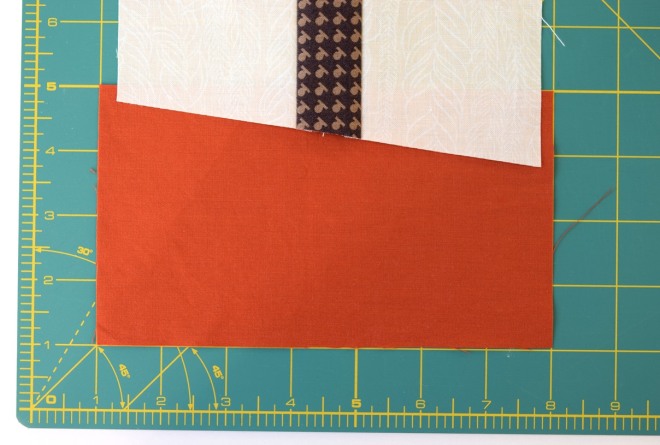 Place your ruler along the bottom edge of the tree trunk unit and cut on the angle.
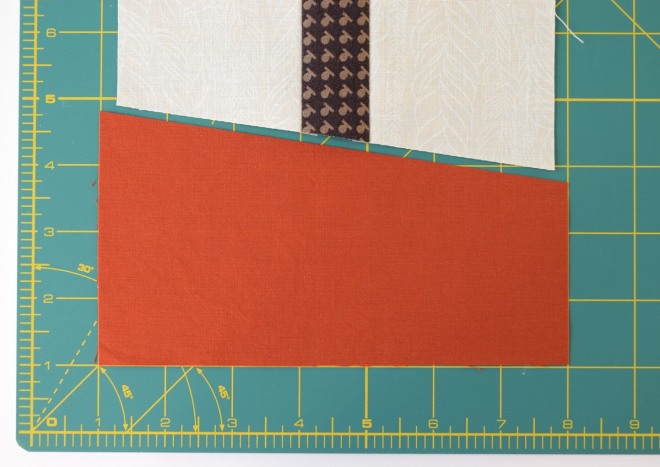 Flip the tree trunk unit down toward the ground and align the raw edges. The ground fabric should extend beyond the tree trunk on both sides.
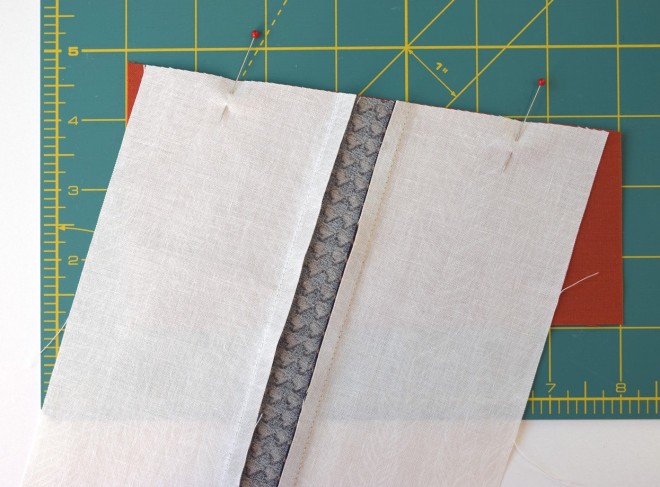 Stitch with a scant 1/4″ seam allowance. Press the seam toward the ground fabric.
 Trim the ground to 6 1/2″ wide. A 6 1/2″ rule makes trimming a breeze.
 See how center of the center of the ruler goes right down the center of the tree trunk?
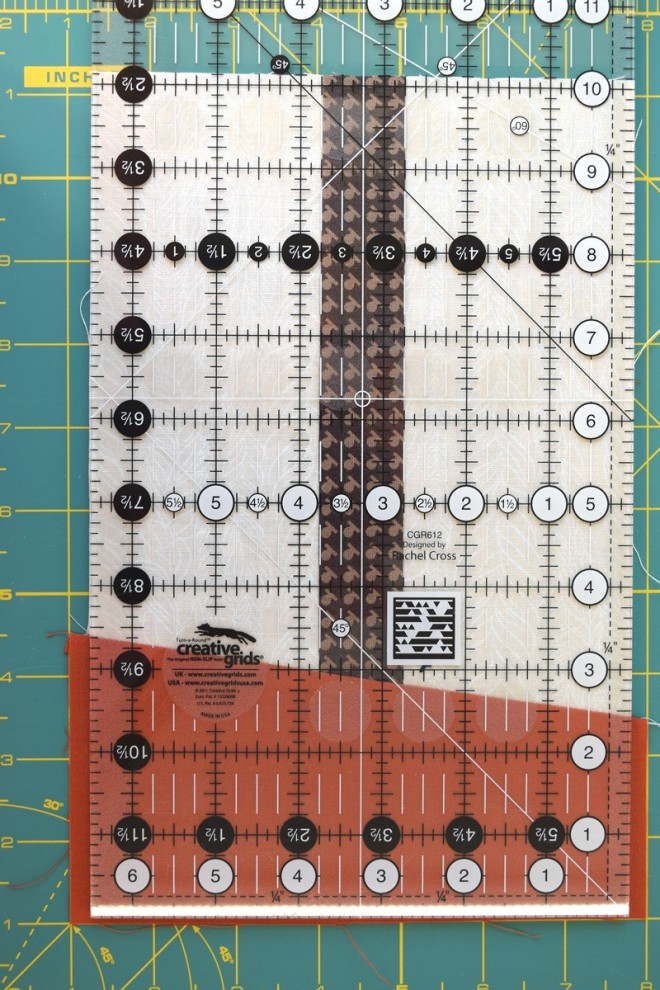 It should look like so after trimming up, 6 1/2″ wide by aprox. 10″ tall.
 Join the flying geese and tree trunk/ground to complete the block. The block should be 6 1/2″ wide. The length should be approximately 18 1/2″, but if it is shorter or longer, it’s fine and you’ll see why in a bit. Congratulations, you’ve completed a Planted Pines block.
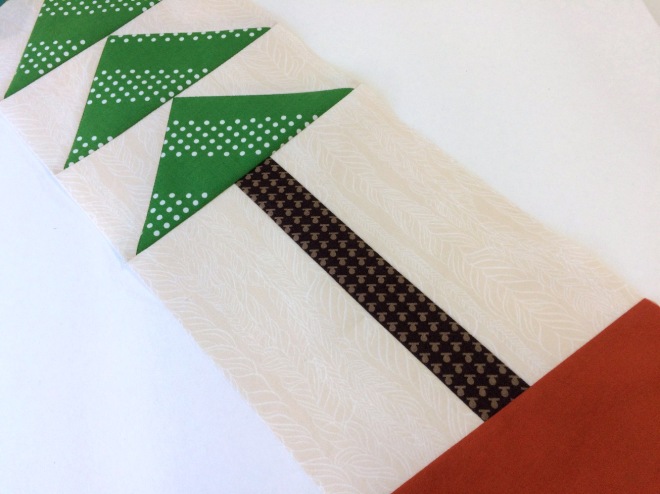
 The trees were thinned this summer and here is a glimpse of the operation.
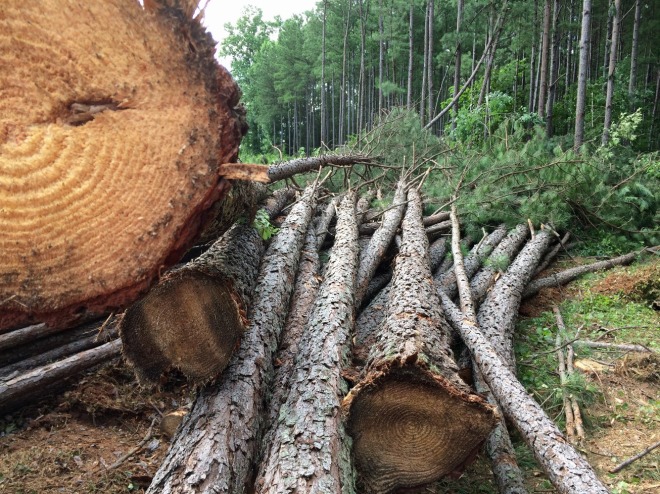 The trees are sorted into chip-n-saw for making waferboard used in new construction and into pulp wood for making paper. I would like to think its going to make the cardboard bolts for holding fabric but there’s no way to know.
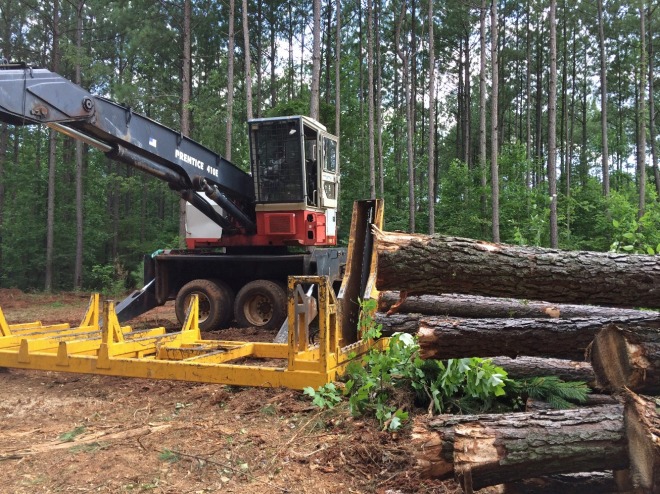 There is always the chance of loosing trees from high winds or ice build up. This tree was blown over in a recent storm.
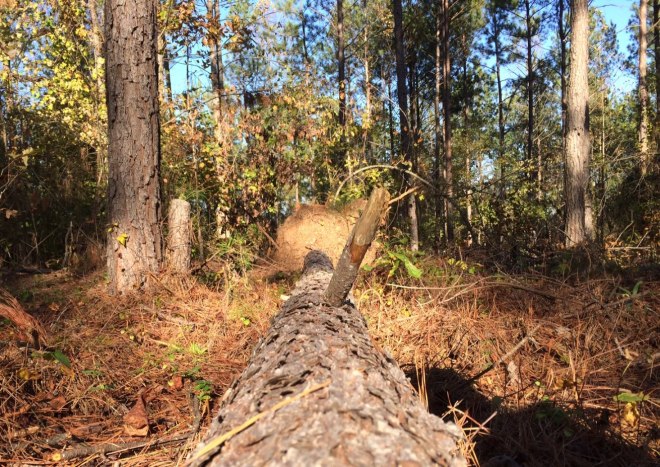 I’m not exaggerating about the color of the red clay in the soil. This is a photo of the root ball from the fallen tree. That’s why I picked out this solid from
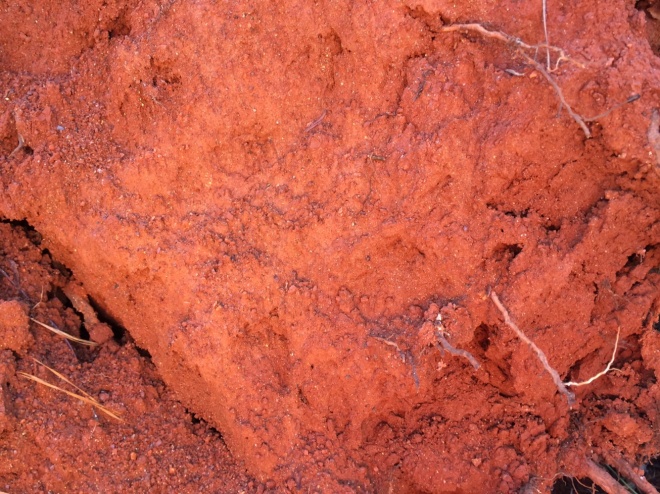


 I’m Irish you see, and the truth is I’ve always wanted to make an Irish Chain quilt but I could never decide if I liked single Irish Chain or Triple Irish Chain quilts better.
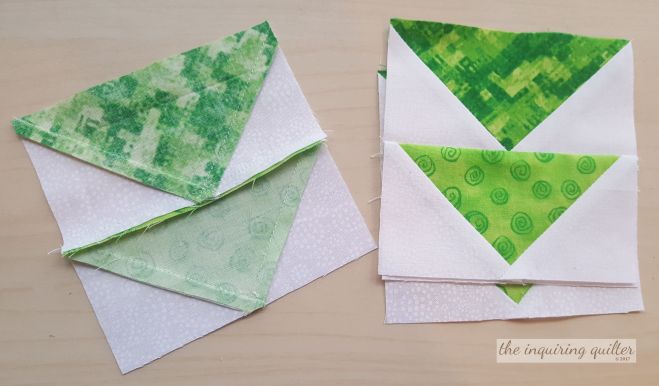 To make the Center, sew (1) 1-1/2” x 2-1/2” rectangles to either side of (1) Dark Green 2-1/2” square.
 Sew (1) 1-1/2” x 4-1/2” rectangles to the top and bottom of the unit.
 Here’s what I might make with my blocks. I just love this, and all the quilting possibilities it presents. But mostly I’m psyched by the idea that I’ll have a quilt that reminds me of my Bee Inspired bee mates!